


Colossal Snowflake Card Series
- Jules

- Oct 20, 2023
- 2 min read
Happy Friday, crafty friends! Today we are working with a COLOSSAL set of cards using the Colossal Snowflake stamp (and this stamp totally lives up to it's name!). I paired this big ol' snowflake with Shake Your Flakes {Front & Center} Stamp Kit sentiments that add the perfectly small detail to highlight this giant stamp. Let me show you how to create this perfectly blended look by stamping on colored card stock!

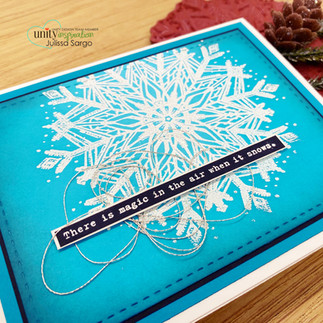
Start with a nice colored card stock. I used a bright turquoise card stock and stamped the Colossal Snowflake using white pigment ink and heat embossed it with white embossing powder. Now to get inky: using Broken China Distress Ink, I blended in the edges of the card all the way too the snowflake.

Next, I used Mermaid Lagoon Distress Ink on the edges to create a little more shadow. I didn't go as deep on the edges for this color so that the center continues to be the brightest part and gets darker toward the edges.

Lastly, I used Black Soot Distress Ink on the edges to deepen the background and brighten the snowflake (not the best picture, but you'll see it better in the later photos). You can use this technique with any color card stock and find inks that are close in color to blend into it.
{Pro Tip: Grey & Black are always great colors to use if you don't have a darker shade of a color.}

This giant snowflake can be moved around to create different looks and works for both orientations for an A2 sized card. For a couple of the cards, I splattered some Perfect Pearls to create a little more dimension and others I used some silver string. This snowflake is bold enough to stand on its own or you can add fine details. This Colossal Snowflake comes with big ideas!


Thanks so much for stopping by and I hope you've found some inspiration.
Until next time... happy crafting!


Comments